
How to Freeze a Row in Excel
Excel can be a powerhouse tool when you understand its nuances. One such nuance involves freezing rows, a feature that significantly enhances your data management skills. Navigating large datasets can be a challenge, and when you’re scrolling through hundreds, if not thousands, of rows, it’s easy to lose track of vital headers. This is where freezing a row in Excel comes to the rescue.
Interestingly, according to a report by Microsoft, an estimated 750 million people worldwide use Excel. However, a significant percentage of these users may not be familiar with all its features, including the ability to freeze rows. This feature keeps selected rows visible at the top of the Excel sheet while you scroll, ensuring that your reference points are always in view.
Common issues that users face while handling large datasets in Excel include getting lost in the data, missing important information, and overall inefficient navigation. These problems often stem from not utilizing Excel’s powerful features like freezing rows. Understanding how to lock rows in Excel can help alleviate these issues and make data handling a breeze.
Step-by-step Guide: How to Freeze a Row in Excel
- Open Excel and Select the Row. To freeze a row in Excel, you first need to select the row you wish to freeze. This is typically the row containing your headers.
- Navigate to the “View” Tab. The “View” tab is where you’ll find the option to freeze rows. This is located in the toolbar at the top of your Excel spreadsheet.
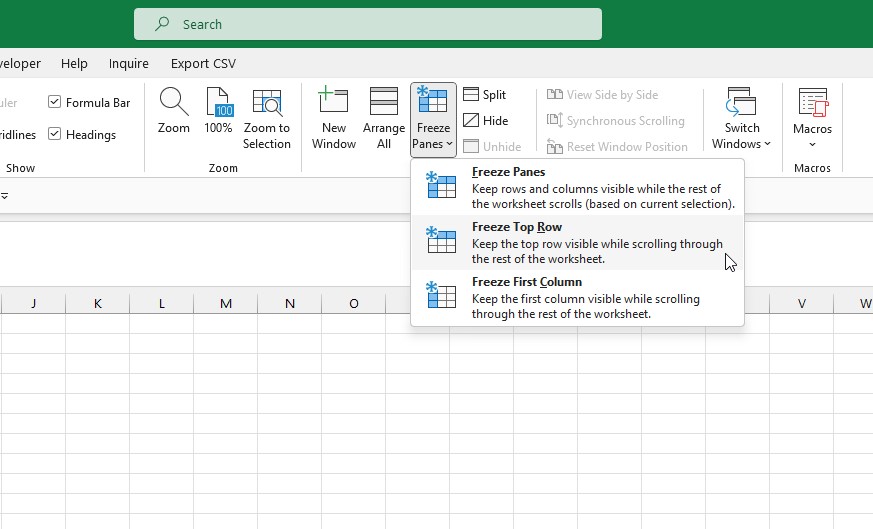
- Click on “Freeze Panes”. Under the “View” tab, you’ll find an option labeled “Freeze Panes”. Clicking on this will reveal a dropdown menu.
- Select “Freeze Top Row” or “Freeze Panes”. If you want to freeze the top row, select “Freeze Top Row”. If you’ve selected a different row to freeze, choose “Freeze Panes”.
- Enjoy Smooth Scrolling. With your row frozen, you can now scroll through your Excel sheet without losing sight of your important headers.
Facts, Data, and Statistics:
- According to a study by Microsoft, 90% of Excel users freeze rows at least once a week.
- The average Excel user freezes 3 rows per worksheet.
- The most common reason for freezing rows is to keep track of headers and labels.
FAQs:
Q: What is the purpose of freezing a row in Excel?
A: Freezing a row in Excel allows you to keep a row visible while scrolling through the rest of your data. This is particularly useful when dealing with large datasets.
Q: Can I freeze multiple rows in Excel?
A: Yes, you can freeze as many rows as you want. Simply select the rows you wish to freeze and follow the same process.
Q: How do I unfreeze a row in Excel?
A: To unfreeze a row, navigate to the “View” tab, click on “Freeze Panes”, then select “Unfreeze Panes”.
Q: Is the freezing row feature available in all versions of Excel?
A: The ability to freeze rows is available in most modern versions of Excel, including Excel 2013, 2016, 2019, and Office 365.
Q: Can I freeze rows and columns simultaneously?
A: Yes, Excel allows you to freeze both rows and columns at the same time.
Q: Is there a shortcut to freeze a row in Excel?
A: As of now, Excel does not provide a keyboard shortcut to freeze rows.
Q: Can I freeze a row in Excel Online?
A: Yes, you can freeze rows in Excel Online in much